Getting started with Choplee: Create your first split in minutes
A step-by-step getting started guide for Choplee — sign in, set up your profile, add friends, create your first bill split, collect payment proofs, and settle your circle.
By Choplee · 7 min read ·
Who this getting started guide is for
If you are new to Choplee, this guide walks you from a blank account to your first settled bill. You will sign in, set a few profile defaults, add the people you usually split with, create one real expense, and close the loop with payment proofs.
Choplee is a bill splitter and settlement ledger for trips, dinners, and house shares. It tracks who owes whom and stores proofs — it does not move money. Cash-out still happens in GCash, Maya, bank transfer, or cash.
Want the bigger picture first? Read How Choplee works or what Choplee solves. If some people will not sign up tonight, see Settle without an account. When you are ready to click through the product, start below — or go straight to the [Choplee home page](/).
Step 1 — Sign in and finish onboarding
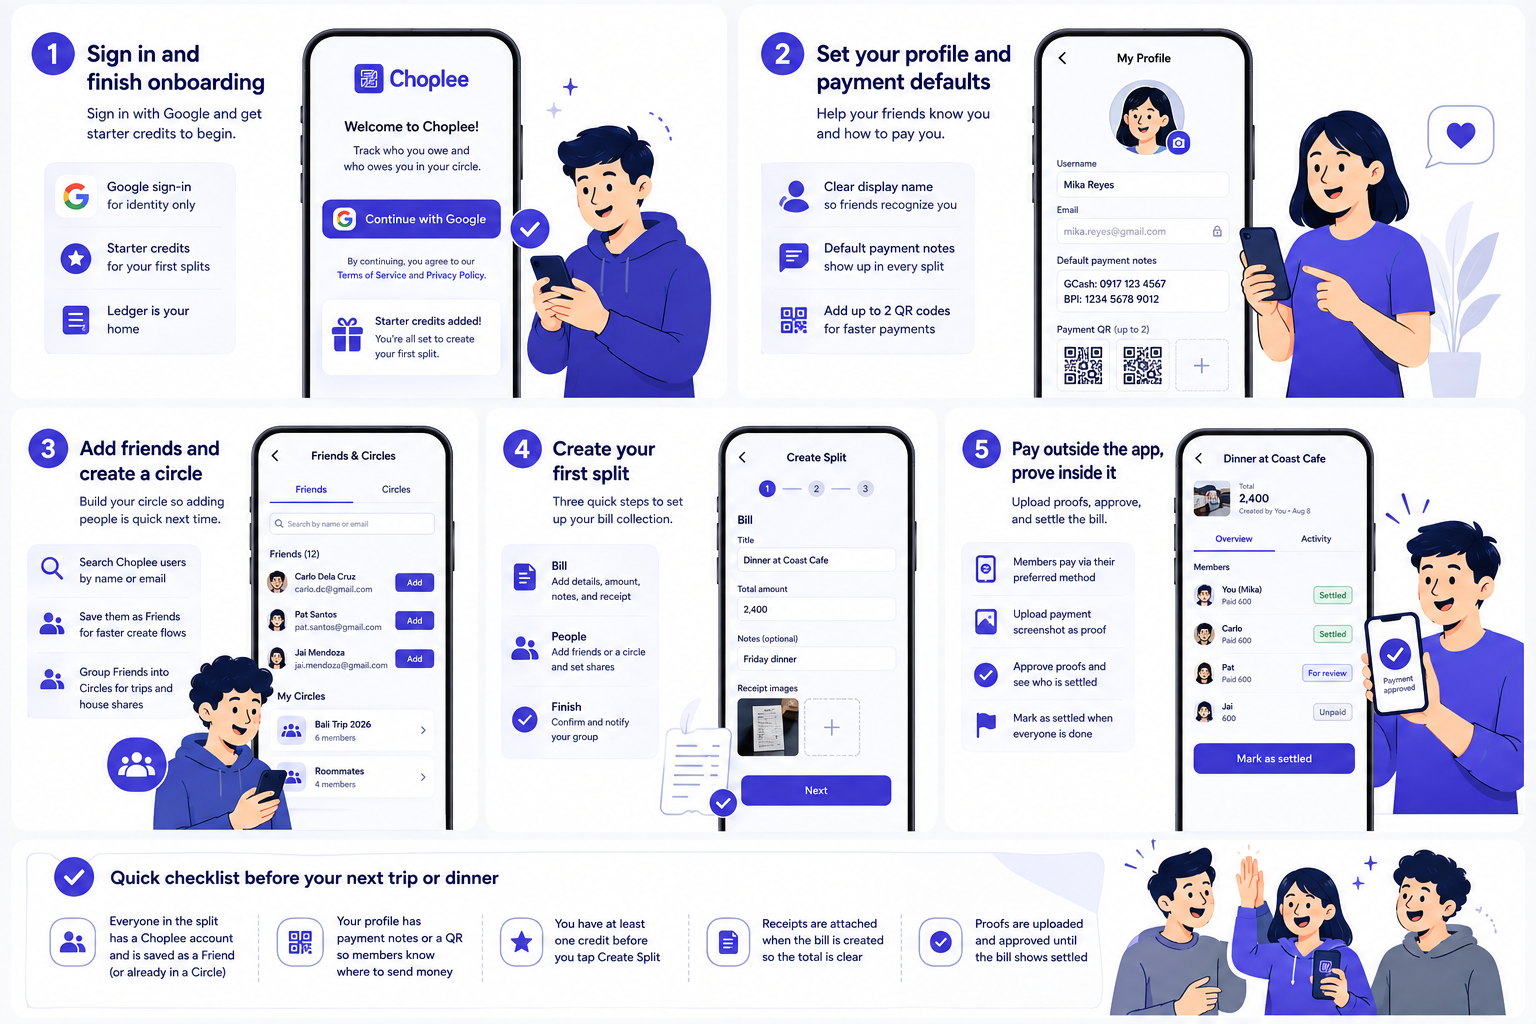
Open choplee.com and sign in with Google. Choplee uses Google for identity only — it does not connect to your wallet or bank.
New accounts start with starter credits so you can create bill collections right away. After you accept the Terms and Privacy Policy, you land on the Ledger: your home list of open and settled bills.
- Use the same Google account you want friends to find you by
- Starter credits cover your first splits; buy more later in Credits when you need them
- Settlement on existing bills does not spend credits
Step 2 — Set your profile and payment defaults
Open Settings → My Profile. Set a clear display name so friends recognize you in search and on bills.
Optional but helpful: add default payment notes (for example your GCash number or bank details) and up to two payment QR images. Those defaults appear when you create a split so members do not have to ask how to pay you every time.
- Username — how you appear on bills and in friend search
- Email — managed by Google sign-in; not edited in Settings
- Default payment details — reusable notes and QR codes for step 3 of Create Split
Step 3 — Add friends (and a circle if you have a recurring group)
In Settings → Friends & Circles, search for people who already have Choplee accounts. Friends must sign up first — Choplee does not send free-form email invites from this screen.
If you split often with the same crew (a travel barkada, flatmates, or a lunch group), create a Circle from those friends. Next time you create a split, you can add the whole circle in one tap instead of rebuilding the member list.
- Search by name or email for existing Choplee users
- Save them as Friends for faster create flows
- Group Friends into Circles for trips and house shares
Step 4 — Create your first split
From the Ledger, open Create Split. Creating a bill collection uses one credit. The wizard has four short steps:
- Bill — title and total amount
- People — add friends, a circle, a Gmail, or a name; then set each person’s share
- Pay — payment notes and QR so members know where to send money
- Finish — attach receipts and create; name-only people get shareable settle links
Step 5 — Pay outside the app, prove inside it
Members pay their share with whatever your group already uses — GCash, Maya, bank transfer, or cash. After paying, they open the bill in Choplee — or a personal settle link from email / a name-only share — and upload a payment screenshot as proof.
As the bill owner, review each proof and approve it when the transfer checks out. That updates who is settled so the group can see progress without chasing screenshots in chat.
When everyone is done, mark the collection settled. Your Ledger keeps both open and settled bills so you can look back without digging through messages.
Quick checklist before your next trip or dinner
Use this short list the next time your circle shares an expense:
- Everyone who should be in the split is added — by Friend/Circle, Gmail, or name (name-only people get a settle link after create)
- Your profile has payment notes or a QR so members know where to send money
- You have at least one credit before you tap Create Split
- Receipts are attached when the bill is created so the total is clear
- Proofs are uploaded and approved until the bill shows settled
If you get stuck
Billing, bugs, settlement questions, and product feedback can go to Support inside the app, or email support@choplee.com. You can also read our About Us page for what Choplee does and does not do, plus the Privacy Policy and Terms & Conditions.
Ready when you are: open Choplee, create one real split, and walk a single payment through proof and approval. That first completed loop is the fastest way to see how settlement stays visible for your circle.